
Destruct-o-Match IIIClick here to go to Destruct-o-Match III |
General Info
Destruct-O-Match III is a puzzle game where your goal is to clear the screen of boulders. In Classic Mode, you progress through levels. For each level, there is a minimum score you must earn in order to move on to the next level. The score you must earn per level increases with each level. If you fail to earn the required score for the level, and there are no more boulders on the screen that you can destroy, your game is over. For information about other modes, refer to the "other modes" section.
How to Play
When two or more boulders of the same color are touching each other, you can destroy the boulders by clicking on them. Your first click will highlight all the boulders in the group you're about to destroy; your second click will destroy the group of boulders.
In the screenshot below the most important parts of the game are labeled:
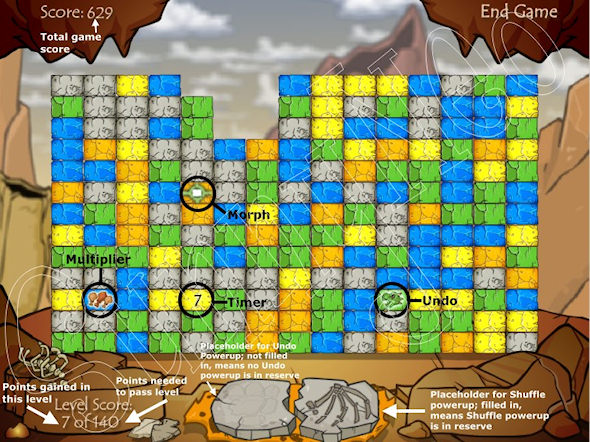
At the top of your screen you see your total game score. At the bottom of the screen, you see your level score. In each level you need to gain a certain amount of points in order to move on. Right next to that, there are two stones; clicking on one of these stones will activate an Undo or Shuffle powerup (if you have managed to collect the powerup that corresponds to that stone). You can read more about the powerups in the sections below. Between the regular boulders, you may also find powerup boulders. All of the Powerup Boulders will also be discussed in a latter section.
Scoring
Every time you destroy a group of boulders, you get points. You get extra points when you destroy larger groups of boulders. You can also get bonus points at the end of each level if you have few boulders left over. The scoring is explained in the tables below.
| Number of boulders in Group | Score For Destroying Group |
| 2 | 2 |
| 3 | 3 |
| 4 | 4 |
| 5 | 6 |
| 6 | 7 |
| 7 | 9 |
| 8 | 11 |
| 9 | 12 |
| 10 | 14 |
| 11 | 17 |
| 12 | 19 |
| 13 | 20 |
| 14 | 22 |
| 15 | 24 |
| 16 or more | Double points (score is twice the number of boulders in the group) |
| Number of boulders Left at End of Level | Bonus Points Earned |
| 0 | 100 |
| 1 | 90 |
| 2 | 80 |
| 3 | 70 |
| 4 | 60 |
| 5 | 50 |
| 6 | 40 |
| 7 | 30 |
| 8 | 20 |
| 9 | 10 |
| 10 or more | 0 |
Powerup Boulders
In the section below you can read all about the various powerup boulders, and the special effect that activates when you destroy them. Below that is a section explaining how to strategically use the powerup boulders.
Fill
Destroying this boulder will add one new boulder to the top of each column on the screen, excepting any column that contains a stack of boulders that is already at its full height. The boulders added by the Fill boulder will always be colors that are on the screen at the time the Fill boulder is destroyed- it won't add boulders of colors that are not on the screen.
The Fill boulder may seem like a bad thing, since it adds more boulders to the screen. However, it's actually a good thing- more boulders means more potential points! Since the Fill boulder will not add a boulder to the top of a column of boulders that is already at its full height, make sure to destroy at least one boulder from each column before destroying the Fill boulder; that way, the Fill boulder will drop the maximum possible amount of boulders.
If you've got an Overkill boulder on the screen, destroy it before destroying the Fill boulder; that way, there will be one less color of boulder that can potentially be dropped by the Fill boulder. Don't wait until late in the level to destroy the Fill boulder, though; you should destroy it fairly early on, when there are lots of other boulders on the screen that can potentially match up with the new boulders dropped by the Fill boulder.
Timer
This boulder shows a clock that is counting down. If the clock gets to zero before you destroy it, it will become indestructable. If the Timer boulder is touching other boulders of its color when the timer reaches zero, then all those boulders will also turn into indestructable boulders. Indestructable boulders can only be destroyed by the Explode boulder.
If you have a Timer boulder on the screen, try to destroy it first. You don't want to get stuck with an indestructable boulder!
Multiplier
This powerup starts to appear at level 3 at the earliest. When you destroy a group containing this boulder, you will get 3 times the amount of points that you normally would have for destroying a group of that size.
The Multiplier boulder is very important. In earlier levels, where there aren't many different colors of boulders, there are likely to be several boulders of the same color as your Multiplier boulder. This means you may be able to get the Multiplier boulder into a very large group and get a big score. Using the Multiplier boulder to score large amounts of points in the early levels is the best way to end up with a big final score.
If you've got a Multiplier boulder in an early level, wait to destroy the boulders that are the same color as the Multiplier boulder. Instead, destroy as many boulders as you can that do NOT match the color of the Multiplier boulder. This often helps to form a larger group of boulders containing the Multiplier boulder.
In later levels, it's harder to get the Multiplier boulder into a large group, because there are many different colors of boulders, and therefore there won't be such a large amount of boulders on the screen that are the same color as the Multiplier boulder. However, it can be difficult to pass later levels without the boost you get from a decent-sized group of boulders containing the Multiplier boulder.
Explode
Clicking in this boulder causes all boulders touching it (including the ones touching its corners) to be destroyed. This means you can destroy up to nine boulders by using the Exlode boulder; however, you will only earn one point for using the Explode boulder, regardless of how many boulders it destroys. Unlike all of the other powerup blocks, this block does NOT need to be touching other blocks of its own color in order to be destroyed. Also, unlike all the other blocks, you must only click it once in order to destroy it.
If there is an Explode boulder on the screen, wait to destroy it until you've destroyed as many of the other boulders as you possibly can. That way, if you only have a few boulders left at the end of the level, you can use the Explode boulder to destroy them, thus getting a larger end-of-level bonus for having few or no boulders left over.
Overkill
Destroying this boulder causes all the boulders on the screen which match its color (including the ones not in its group) to be destroyed.
If an Overkill boulder is on the screen, it's good to destroy it fairly early in the level; getting rid of one color of boulder makes it easier to destroy the rest of the boulders. However, you should wait to destroy the Overkill boulder until after you've destroyed as many of the other boulders of its color as you possibly can. This is because boulders destroyed by the Overkill boulder do not add to your score, excepting the boulders that are in the group that actually includes the Overkill boulder.
Morph
This boulder shifts between different colors every few seconds. It will shift to any color that is included in the level it appears in.
You can use the Morph boulder or the Wildcard boulder (explained below) in order to enlarge the group of boulders containing the Multiplier boulder. You can also use either of these boulders in order to destroy a Shuffle boulder (explained below) that you otherwise would not have been able to destroy. In later levels which are difficult to pass, it can be helpful to save the Morph boulder until near the end of the level; it may help you destroy the last few boulders that you need to destroy in order to advance to the next level. Remember not to destroy all other matching groups of boulders before destroying the Morph boulder; if you do this, and the Morph boulder is not currently a color that matches any of the boulders touching it, then the level will end and you will not be able to use the Morph boulder.
If you're on a later level, and you're in a situation where you have a Shuffle boulder on the screen as well as a Shuffle powerup in reserve, and you're waiting to destroy the Shuffle boulder until near the end of the level (so that you can try to replace your Shuffle powerup if you end up using it,) then it's especially helpful to save the Morph boulder as well. Saving the Morph boulder gives you a bigger chance of being able to destroy the Shuffle boulder, since the Morph boulder may end up next to the Shuffle boulder.
Wildcard
This boulder can be used as part of a group of any color of boulder. Destroying a group of boulders that is touching this boulder will automatically destroy it, too.
Undo
Destroying this boulder will cause an image to appear on one of the stones at the bottom of the screen. The stone can then be clicked on at any time to activate the powerup. Activating the powerup will undo your last move. You cannot hold more than one of these at a time. This powerup cannot be used if your last move was destroying a powerup boulder, or using a Shuffle powerup.
The Undo powerup is nice to have, but isn't anywhere near as important as the Shuffle powerup. Collect the Undo powerup if it's easy to do so; otherwise, don't worry too much about it. Obviously, you can use the Undo powerup to undo a mistake that you've made. Also, if you'd like to destroy a group of boulders, but you aren't sure exactly how this will change the configuration of the other boulders, you can try destroying the group of boulders, and then use the Undo powerup if the results are not satisfactory.
Shuffle
Destroying this boulder will cause an image to appear on one of the stones at the bottom of the screen. The stone can then be clicked on at any time to activate the powerup. Activating the powerup will cause a Scorchio to fly across the screen and randomly change the configuration of all the boulders. You cannot hold more than one of these at a time.
If a Shuffle boulder is on the screen, and you don't already have a Shuffle powerup in reserve, try to destroy it as soon as possible. The Shuffle powerup is very important, and you don't want to accidentally put the Shuffle boulder into a position where it isn't possible to destroy it because no other boulders of its color are touching it. Of course, if the Shuffle boulder is touching another boulder of the same color that is directly above or below it, you don't need to worry about accidentally shifting it into a position where it can't be destroyed. But if the only boulders of its color touching it are on the left and/or right side of it, it may be shifted so that it is no longer touching any boulders of its color.
If the Shuffle boulder isn't touching any boulders of its color, try destroying boulders around it in order to shift the boulders into a position where it becomes possible to destroy the Shuffle boulder. (You can also use this technique to destroy other boulders you need to destroy, such as the Timer boulder or the Overkill boulder.)
Once you have a Shuffle powerup in reserve, don't use it frivilously; save it for when you really need it. You shouldn't need to use it in order to pass the earlier levels. However, in later levels, you may need to use it near the end of the level in order to gain enough points to advance to the next level. Don't use your Shuffle powerup at the end of the level unless you actually need to use it in order to pass the level. Before you use your Shuffle powerup at the end of the level, make sure there is still one group of matching boulders (or an Explode boulder) on the screen; if you destroy all boulders that it's possible to destroy, the level will end and you will not get a chance to use your Shuffle powerup!
If you're on a later level that is difficult to pass, and you've already got a Shuffle powerup in reserve, and there is a Shuffle boulder on the screen, wait as long as possible to destroy the Shuffle boulder. That way, if you have to use your Shuffle powerup near the end of the level, there's a chance that you could then destroy the Shuffle boulder, thus replacing your Shuffle powerup immediately.
Aside from using the Shuffle powerup to help you pass difficult later levels, another good use of the Shuffle boulder involves using it to increase the score that you can get from a Multiplier boulder. If you've got a Multiplier boulder on the screen, but you're unable to get it into a large group of boulders of its own color, the Shuffle powerup can be used to rearrange the boulders. With luck, this may enable you to make a larger group of boulders containing the Multiplier boulder.
Scamander
This boulder appears only in the Extreme modes. A Scamander will come out and sit on a column of boulders, preventing it from rising temporarily.
Levels
The game contains a total of 11 levels. Every 2 levels, one new color of boulder is added. This is shown in the table below.
| Level | Number of Different Colors of Boulders |
| 1 | 4 |
| 2 | 4 |
| 3 | 5 |
| 4 | 5 |
| 5 | 6 |
| 6 | 6 |
| 7 | 7 |
| 8 | 7 |
| 9 | 8 |
| 10 | 8 |
| 11 | 9 |
In each level, you need to get a certain number of points within the level in order to advance to the next level. At the bottom left of the screen, under the text "Next Level," you can see how many points you need in order to advance, as well as how many points you've earned so far on that level. At the top left side of the screen, your overall score (for all levels combined) is displayed next to the word "Score." The table below shows how many points are needed to advance past each level.
| Level | Points Needed to Advance |
| 1 | 100 |
| 2 | 120 |
| 3 | 140 |
| 4 | 160 |
| 5 | 180 |
| 6 | 200 |
| 7 | 220 |
| 8 | 240 |
| 9 | 260 |
| 10 | 280 |
| 11 | Last level; can't advance |
Level Strategy
Restart level one until you get an Overkill boulder, and preferably an Explode boulder. This will help you to destroy all the boulders in level one, earning you the 100 point bonus. If you don't get the 100 point bonus (or something very close to it), restart the game. Remember that destroying larger groups of boulders will gain you more points, so try to make your groups of boulders as large as possible. This is easier to do in early levels when there are fewer colors of boulders. If you're going for the avatar score, you should be ending level one with around 300-350 points.
Just like level one, level two only has four different colors of boulders. Therefore, it should be easy to make large groups of boulders to destroy, and to get a bonus at the end of the level. If you don't get a bonus of around 80-100 points at the end of level two, you may want to restart. It's also very good if you've got a Shuffle powerup in reserve by the end of this level. Make sure not to waste your Shuffle powerup on these early levels; you should be able to get a large end-of-level bonus without it. If you're going for the avatar score, you should ending level two with around 600-650 points.

Try to get this bonus at the end of both level 1 and level 2
Level three is the first level where the Multiplier boulder may appear. Levels three and four each only have five different colors of boulders, so it's easiest in these levels to get a huge amount of points by using the Multiplier boulder. You need these points in order to get a really high final score. Though it's a pain, you should restart the game if there is no Multiplier boulder in level three.
In levels three and four, if you've got a Multiplier boulder but can't manage to get it into a large group of boulders, try using a Shuffle powerup to help you. Also, getting an Overkill boulder in levels three and four will be very helpful in getting an end-of-level bonus, and the Overkill boulder will be especially helpful if you've got a Multiplier boulder at the same time. The Overkill boulder will never be the same color as the Multiplier boulder; therefore, the Overkill boulder will only destroy boulders that do not match with the Multiplier boulder. With less colors of boulders on the screen, it's easier to make a large group of boulders connected to the Multiplier boulder.
If you're going for the avatar score, it's important to score big in both level three and level four, through the use of the Multiplier boulder and/or getting a bonus at the end of the levels. You should be ending level three with around 1050-1100 points and ending level four with around 1400-1450 points. If you don't have quite that much by the end of level four, you may be able to make up for it in later levels, but getting a large score in each level gets a lot harder from here on in.
Levels five and six each have six different colors of boulders. That means it's much more difficult to get end-of-level-bonuses on these levels. Also, if you're lucky enough to get a Multiplier boulder in these levels, it's harder to get the Multiplier boulder into a really big group. You may only be getting around 200-250 points for each of these levels. Just try to get extra points where you can by arranging the boulders into large groups and making use of any Multiplier boulders that you happen to get.
Levels seven and eight each have seven different colors of boulders. At this point, you're probably just fighting to stay alive and advance through the levels. You probably won't be getting an end-of-level bonus in these levels. Just try to score high enough to pass the levels by getting the boulders into large groups and using any Multiplier boulders that appear. If you're near the end of the level, pay attention to what your level score is, and check to see how far away you are from the amount of points you need in order to pass the level. When you earn enough points to pass the level, you'll hear a ding sound. If you need to, use a Shuffle powerup near the end of the level in order to help you destroy enough boulders to pass the level.

The seven different colors of boulders you'll see in levels 7 and 8
By level nine, you should be very close to the avatar score, and you should be able to reach the avatar score sometime during level nine. If not, just continue to try to pass the levels- but remember that there are only eleven levels total, and each level is harder to pass than the last, since the number of points required to pass the level goes up by 20 each level. In the later levels, it's not possible to pass the level unless you get extra points by making large groups of boulders or using the Multiplier boulder. This is because the total number of boulders on the screen is actually less than the amount of points that you need to pass the level. As you can see, it's very important to score big in the lower levels if you're going for a high score.
Example Strategy
Here we will run through an imaginary level, in order to demonstrate the order in which you should do things, and how to do them. This imaginary level contains all the different powerup boulders.
First, you check the screen to see which powerup boulders are on it. You notice a yellow Timer boulder. You've got to destroy it quickly before it becomes indestructable! Unfortunately, no other yellow boulders are touching it. That means you must start destroying boulders in the vicinity of the Timer boulder, so that you can shift it into a position where another yellow boulder is touching it.
However, you see that you also have a green Multiplier boulder on the screen. That means that you don't want to destroy any green boulders yet; you'll want to try to use those later, when you make a large group of boulders containing the Multiplier boulder. So you destroy some of the non-green boulders in the area of the Timer boulder until you manage to shift a yellow boulder down into a position where it's touching the Timer boulder. Now you can destroy the Timer boulder!
You notice that you have an orange Overkill boulder. You'll definitely want to use that, so it's important that it's in a position where it's touching another organge boulder. You see that the Overkill boulder is only touching one other orange boulder- an orange boulder on its right. That means that when you start destroying other boulders, it would be possible to shift the boulders in such a way that the Overkill boulder is no longer touching another orange boulder, and you don't want to do that.
So, you start destroying the orange boulders on the screen that are not part of the group that is touching the Overkill boulder, but you're careful not to shift things in such a way that it becomes impossible to destroy the Overkill boulder. If you have to skip over destroying some orange boulders in order to avoid shifting the Overkill boulder into a bad position, you do. Some orange boulders aren't touching any other orange boulders at all, so you don't destroy those, either.
Now you've destroyed all the orange boulders that you possibly can, and it's time to destroy the group of orange boulders that contains the Overkill boulder. Now you have no more orange boulders on the screen! Things will be easier!
You see that you have a blue Shuffle boulder on the screen. It's touching another blue boulder that is directly below it. This is good; it means that destroying other boulders can't possibly cause the Shuffle boulder to be shifted away from the blue boulder underneath it. Therefore, you don't have to worry about accidentally putting the Shuffle boulder into a position where it becomes impossible to destroy.

The blue Shuffle boulder has a matching blue boulder below it
You already have a Shuffle powerup in reserve. If you had no Shuffle powerup in reserve, and the Shuffle boulder was only touching other blue boulders on the right or left, you would destroy it right away. But this isn't the case, so you don't destroy the Shuffle boulder yet.
You notice that you have a Fill boulder. You check the height of all your columns of boulders. If you see one that is at full height, you destroy at least one boulder from that column- still being careful not to destroy any green boulders, since green is the color of the Multplier boulder. Now that each column of boulders has been shortened by at least one boulder, you go ahead and destroy the Fill boulder- you don't want to wait to destroy it until there are very few boulders left on the screen.
You see that there's an Undo boulder on the screen. You don't have an Undo powerup in reserve, but having an Undo powerup isn't overly important, so you don't pay attention to the Undo boulder at this time. If you happen to destroy it during the course of the level, then great; if not, it's no big deal.
Now you want to make a large group of green boulders that are all touching the green Multiplier boulder. So you start destroying all of the non-green boulders that you can (excepting the Shuffle boulder and the other blue boulder that is touching it, because you're saving that for later.) You make sure to destroy any non-green boulders that are separating green boulders from your group that contains the Multiplier boulder. You destroy most of the groups of non-green boulders, and now you see that your Multiplier boulder is part of a very large group of green boulders. There are a couple other non-green boulders that you could destroy, but you see that doing so would shift the boulders in a way that would split up the big group of green boulders containing the Multiplier boulder. So you leave those boulders alone, realizing that the group containing the Multiplier boulder is as big as you can get it.
Unfortunately, you had to destroy your Wildcard boulder while you were destroying the non-green boulders, but you don't worry about this; if you destroy any group of boulders that is touching a Wildcard boulder, it will be destroyed too, so it's almost impossible to save the Wildcard boulder for a specific purpose. Now you're ready to destroy the group containing the Multiplier boulder- you do so, and earn some extra points!
Now you start destroying all of the other boulders that you can. Luckily, you happen to destroy the Undo boulder, so now you've got an Undo powerup in reserve. It's starting to get to the point where there aren't many matching groups of boulders left, and you still don't have enough points to finish the level. You do a quick check to see how many more boulders you can destroy- there aren't enough matching sets to give you as many points as you need to finish the level.
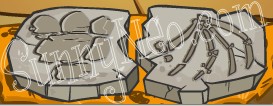
What it looks like when you have both a Shuffle powerup and an Undo poweup in reserve
It looks like you're going to have to use your Shuffle powerup. You've still got the blue Shuffle boulder on the screen, and since it's still touching the blue boulder that has been beneath it the whole time, you could destroy it. But you don't want to destroy it yet- you want to save it until after you've used your Shuffle powerup.
You've also got an Explode boulder on the screen, because you've been saving it for the end of the level. It's nice to have the Explode boulder on the screen; now you don't have to worry about accidentally destroying all possible groups of boulders, which would end your level before you could use your Shuffle powerup. As long as the Explode boulder is on the screen, the level won't end. So you destroy all the rest of the groups of boulders that you can, excepting the Explode boulder and Shuffle boulder.
You realize that even if you destroyed the Shuffle boulder and the Exlode boulder now, you still wouldn't have enough points to complete the level. So you'll definitely need to use your Shuffle powerup. It's a good thing that you also haven't destroyed the Morph boulder yet- it could be helpful after you use your Shuffle powerup.
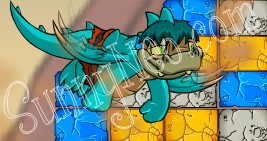
The Shuffle powerup in action- a Scorchio flies across the screen, rearranging the boulders
You click to use your Shuffle powerup. The boulders all shift around. Now there are some more matching groups of boulders that you can destroy. Of course, shifting the boulders like this has shifted your blue Shuffle boulder into a different position, and now it's no longer touching another blue boulder.
Luckily, the Morph boulder is now next to the Shuffle boulder! You wait for the Morph boulder to turn blue, and then you destroy the Shuffle boulder. Now you've already got a Shuffle powerup in reserve again! You proceed to destroy all the other groups of matching boulders that you can. You hear a "ding" sound and realize that you've now got enough points to pass the level!
Now the only boulder left that you can destroy is the Explode boulder. There are only a few boulders left on the screen, and some of them are near the Explode boulder. You click the Explode boulder. It destroys the boulders touching it, leaving only two boulders left over on the screen. You just earned an 80 point bonus for having only two boulders left, and you've passed on to the next level!
Extra Tips
Every time you destroy a group of boulders, it shifts around any boulders that are above the boulders that were destroyed. Always keep this in mind when destroying a group of boulders. With practice, you'll learn exactly how the configuration of boulders will shift with each group you destroy.
When boulders of the same color are touching each other horizontally (to the left and right), destroying boulders under them may cause them to shift in such a way that they are no longer touching. It may then be difficult to destroy these boulders later. So, if you've got boulders that are only touching horizontally, you may want to destroy them before you destroy any boulders underneath them.
On the other hand, boulders of the same color that are touching vertically (above and below) cannot be shifted away from each other by destroying other boulders. If you've got a vertical line of boulders of the same color, you can wait until later to destroy them. As you destroy other boulders, the configuration of the board will change, and this may cause the vertical line of same-color boulders to shift down and into a position where the line is now touching other same-color boulders in neighboring columns, thus making a larger group.
Many people say you should start by destroying boulders nearer to the bottom of the screen. This is because destroying groups nearer to the bottom of the screen shifts around more boulders (since there are more boulders above them), and this can possibly change the configuration of the board in advantageous way.
Other Modes
In Extreme Mode, lines of boulders will appear at the bottom of the screen, and you must continually destroy groups of boulders in order to keep the boulders from reaching the top of the screen. If the boulders reach the top of the screen, your game is over. In this mode, you only need to click once to destroy a group of boulders. Double Trouble Extreme Mode is similar to Extreme Mode; the difference is that the screen is split into two, and you have two different piles of boulders that you must keep from reaching the top of the screen. In the two Extreme Modes, there are no special boulders, aside from the Scamander boulder.
Double Trouble Mode is similar to Classic Mode; much like Double Trouble Extreme Mode, the difference is that the screen is split into two, and you have two separate piles of boulders that you must destroy. Just like in Classic Mode, you must destroy a certain amount of boulders in each level in order to advance to the next level.
You may want to play the above modes for fun; however, it's virtually impossible to get a really good score in any of these modes, so most people treat them as novelty modes. There is also a Zen Mode, which allows you to play in Classic Mode for as long as you want with no danger of getting a "game over." You don't score any points in Zen Mode, so it's just for practice.

Destruct-O-Match II
Score 2,500 or more points at Destruct-O-Match III.
Tip: Read SunnyNeo's Destruct-O-Match III game guide for tips on how to play this game.
Destruct
-o-
neoHTML
Match Master!!
neoHTMLneoHTML
Match Master!!
siggy
 {{ loadingMessage || 'Loading, one moment please'}}

